The Red Hot Pokers - Kniphofia species include some of the most exotic flowering plants that you can grow in a northern European garden. Named after Johann Hieronymus Kniphof (an 18th-century German physician and botanist) Kniphofia is a genus containing some 70 species of herbaceous plants.
How to grow the red hot poker
Native right across the African continent, all kniphofia species produce spikes of upright, brightly colored flowers in shades of red, orange and yellow, although they can often be bicoloured. The flowers produce copious amounts of nectar and are particularly attractive to bees. When grown in central America they can also be used to attract hummingbirds and orioles.
Kniphofia will grow best in full sun and are adaptable to almost any garden soil so long as it is well drained. Be aware that kniphofias will not thrive in wet or poorly drained soils. Neither will they perform well on richly manured soils. However it is worth applying a light organic fertiliser in the early summer.
How to grow the red hot poker
Plant kniphofia in September and october or in April making sure that the holes are sufficiently deep to accommodate their spreading roots. Do not allow the plants to dry out while they are establishing themselves. On heavy soils and in cold, wet areas the or bracken during the first year plants will need a 6 inch deep covering of straw or bracken during its first year in order to protect the flesh crowns from frost damage.
In spite of the height of the flower stems kniphofia will not need staking. Remove any dead or dying flower heads as they appear to encourage further flowering. In November or December tie up the remaining leave to protect the crown against excessive moisture.
Lemons trees are one of the most coveted of all the fruit trees and while they may be expensive to purchase they are relatively simple to propagate from. The easiest way to produce your own lemon tree is to grow one from seed but there is a problem with this. Lemon trees grown from seed do not grow true to the parent plant. However there is a technique where you can produce a genetically identical plant, and that is by taking cuttings. Before you start make sure that you have some rooting hormone powder handy.
How to grow a lemon tree from cuttings - http://whiteonricecouple.com/
The best time of year to take cuttings from lemon trees is anytime between April and September. It is best to plant up any cuttings as soon as possible so before taking your cutting prepare your pots first. Wash your pots out with hot soapy water and rinse thoroughly before drying. Fill the pots to within an inch of the top with a good quality compost such as John Innes 'Seed and Cuttings', or you can make your own mix using one part perlite and one part peat, or one part peat and one part coarse river sand. Water well and allow the water to drain from the pot.
Select a young branch of new wood that does not have any fruit or flowers. The stem should be round healthy, pest and disease free. Using a sterilized knife or secateurs make a 8-10 inches long cut just below a leaf node. You can identify new wood by its lack of bark and green stem color.
Remove any lateral stems and leaves except for those near the apical tip. The leaves that are remain will then need to be cut in half to reduce transpiration.
Dip the cut end into the powdered rooting hormone, then shake off excess hormone. Do not push the cutting directly into the compost, instead stick a pencil in first to create a hole. This helps to prevent the rooting hormone from being wiped off the end of the cutting.
How to grow a lemon tree from cuttings
Place the cutting inside a heated propagator and set the temperature to 18-20 degrees Celsius or cover the cutting with a clear polythene bag, of the bottom half of a clear plastic drinks bottle. Place the cuttings on a warm bright windowsill but out of direct sun.
Regularly mist the cutting with water to maintain high humidity and gently water the compost if it begins to dry out. Just make sure that the compost is not waterlogged.
The roots should form and extend into the compost in 3-4 weeks, to check if rooting has occurred gently tug on the cutting to see if it is stable within the pot. If it is then rooting has occurred and the plants can be removed from the propagator or have their covers taken off. keep them on the warm bright windowsill or move to a cool greenhouse for a couple more weeks as they establish in the pot. If they are kept in the greenhouse then shading may need to be provided.
Before being placed outside the young plants will need to be hardened off for a week or so otherwise the leaves will be scorched in the direct sun. Keep the cutting in a pot for the first year, repotting as necessary. In Mediterranean climates they can be planted directly outside in a sunny position. In colder countries they will need to be kept in pots outside and brought in under protection over the winter.
For related article click onto the following link:
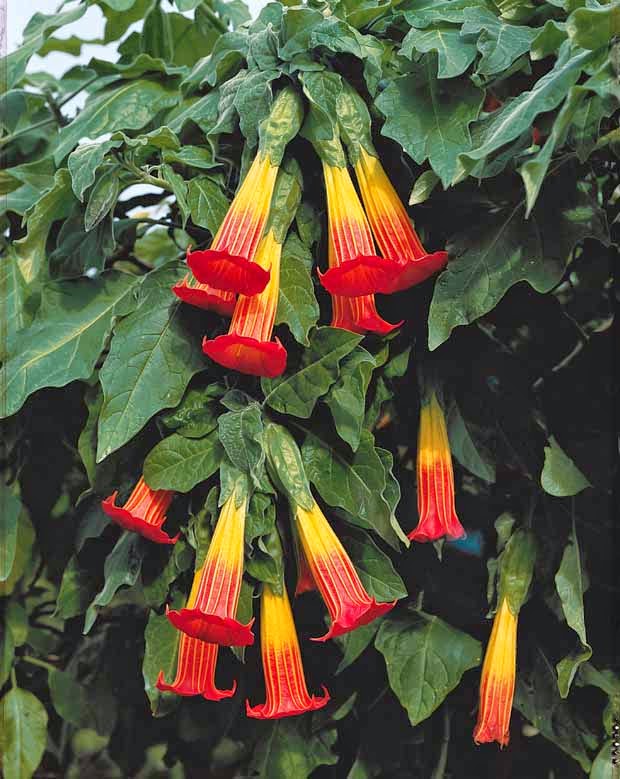
The Angel's Trumpet - Brugmansia species and cultivars, contain some of the most beautiful and exotic of all ornamental flowering plants. Native to the tropical regions of South America they are grown as ornamental container plants across the globe, and have become naturalized in isolated tropical areas including Africa, Australia, and Asia.
How to grow Brugmansia - The Angel's Trumpet
The Brugmansia genus contains 7 recognised species, all of which are easily differentiated from their cousins the Datura genus from their pendulous (instead of upright) flowers. Perhaps the most popular species is the gorgeous red-orange flowered Brugmansia sanguinea.
Native to Mexico, Brugmansia sanguinea is a little smaller than the other species within this genus growing to approximate 4-6 ft in height. It is actually evergreen in its home environment but will be deciduous when overwintered in cooler climates. The flowers are produced from July to August.
They will prefer any good quality, rich, well-drained soil in a position that receives full sun. Provide a sheltered position so that they are protected from strong winds, and offer some shade from midday sun. Water freely over the growing period.
Brugmansia are hungry plants and will need feeding with a liquid soluble fertiliser every week or two up until September.
If you are growing Brugmansias in containers then use a good quality compost such as John Innes '2 or 3'. In cooler European climates they will do best planted directly into the soil in a greenhouse border. In the spring and summer ventilated freely and keep the compost well-watered. During the height of the summer you may need to provide some light shading. Of course they can be grown outside over the summer once the threat of late frosts have passed.
How to grow Brugmansia - The Angel's Trumpet
Brugmansias are usually purchased as small pot-grown specimens in the spring. As these smaller plants grow they can be potted on until they finish in 10-12 inch pots. They are best grown as shrubs pruned back hard, but they can also be grown as small standards. Allow the plants to reach their required height before pinching out the growing tip. This will encourage the formation of lateral growth. You will be looking to achieve a 4 ft trunk.
During the winter the plants will need to be brought under protection. Prior to bringing in you will need to encourage the plant into dormancy and you can do this by steadily holding back on the water in the Autumn. Once the Brugmansia has dropped its leaves keep on the dry side of moist but do not allow the root ball to become complete dessicated. Keep the plants cool at a temperature of 7 degrees Celsius. When new growth appears in the spring watering can be slowly increased.
The Angel's Trumpet is a common name given to two similar looking groups of plants from different genuses (Brugmansia and Datura), although they are both found from within the same family and tribe. Brugmansia differ from Datura as they large shrubs or small trees with pendulous flowers. Datura are herbaceous plants with erect flowers.
Wild Daturas growing on the Carrizo Plain, California
Datura are restricted to the United States, Mexico, and Tunisia in Africa where the highest species diversity occurs. Brugmansia are native to the more tropical regions of South America. However, even today there is still some confusion between the two genuses as some South American plants formerly thought of as Datura are now treated as belonging to the Brugmansia genus.
Datura are considerably smaller than their Brugmansia cousins reaching an overall height of no more than 3-4 feet. The flowers are exceptional and can be as long as 6-8 inches. You can expect to see your Datura flowering between June and August depending on the species, and they also have a curious habit of opening in the late afternoon and closing up in bright light. Presumably this is an adaption to its environment as pollinating insects are less active in extremes of temperature and light.
How to grow Datura - The Angel's Trumpet
In northern European climates Datura are not hardy enough to survive outside all year round unless they are given suitable protection over the winter. Be that as it may Datura are very forgiving and will happily grow in any ordinary garden soil so long as they are kept in a sunny position. However to get the most out of them it is best to enrich the soil before hand with plenty of well-rotted farm manure or garden compost.
Water freely over the growing period and feed once a month until the early autumn. If you are overwintering your Datura under protection then stop feeding from October and allow the soil/compost to dry out between watering. Do not allow the compost/soil to become waterlogged over the winter period. Your plants can return to their garden position once the threat of late frosts have passed, normally by the end of May.
If your Daturas are being grown as greenhouse specimens they can either be grown directly in the soil as mentioned before or in 6 inch pots containing a good quality compost such as John Innes No'2'. Over the summer they will benefit from light shade to prevent scorching and good ventilation on particularly hot days.
Honeysuckle climbing plants are some of the most popular of all ornamental garden climbers, and why wouldn't they be? Vigorous growth combined with heavily scented flowers, these hardy twiners are ideal for covering large walls, fences and arches.
How to prune honeysuckle?
Unfortunately their vigour can prove a little too much for some and older plants can become woody and in extreme cases unsightly. However this can easily be dealt with by some appropriate pruning.
Overgrown and and straggly plants can be can be thinned out with lateral shoots pruned back to 6 inches in March or April. Don't be timid when pruning and always cut back to a healthy set of buds. Take out any leader that are growing beyond your chosen height.
In extreme cases where the honeysuckle is particularly woody and unattractive it can be rejuvenated by cutting the whole plant back hard to about 3-4 ft from the ground in February. Be aware that this will have a severe impact on the plants flowering during the on-coming season, but come the following year it should flower its socks off.
To keep things in check from this point onwards carry out annual light pruning each year in the spring in order to maintain a neat and tidy shape.
Cuckoo spit is the common name given to a frothy residue which can be found on plants from the late spring into early summer. The spit-like froth serves to act as a protective 'coat' that hides a froghopper nymph from the view of predators and parasites. The froth also insulates against heat and cold, providing thermal and moisture control. Without the froth the soft-bodied insect would quickly dry up and die.
Froghopper nymph in cuckoo spit
The nymphs pierces the plant to feed on the sap and this in itself can cause distortion on young plant growth and occasionally wilt, but long term damage is seldom severe. Much of the filtered fluid from the sap goes into the production of the froth which has an acrid taste serving to deter potential predators.
The adult froghoppers are far more destructive feeding on plants from late July onwards until the autumn before laying overwintering eggs and dying.
The froth and nymphs can be easily removed from infected plants by forcibly spraying them with water from a garden hose or pressurised sprayer. If this is not practical then you can apply a systemic insecticide.
The red lily beetle is a scourge of ornamental lilies and even the sight of a single adult beetle is enough to turn the blood of any passionate gardener cold! As beautiful as they the red lily beetle can quickly destroy your collection of prized lilies and so action will need to be immediate! However there is a problem!
The adult red lily beetle has a highly annoying habit of dropping to the ground when subjected to the slightest interference, while the dull orange larvae cover themselves with a slimy, foul-smelling excreta which deters predators and un-gloved fingers alike.
Red lily beetle larvae
While squashing lily beetles can be extremely satisfying it may not be particularly practical so as a far more effective measures go you may need to apply a systemic insecticidal spray, particularly with heavy infestations.
If you can stomach it avoid spraying when the lilies are in flower as beneficial pollinating insects will also be affected by the insecticide.
Adult beetles overwinter in the soil and move up onto the lilies from late March onwards. Over several months each female lays 200-300 eggs on leaves and stems. You will need to keep a close eye on your plants from April onwards and be aware that madonna lilies are particularly susceptible.
Echium wildpretii is a stunning herbaceous biennial that is native to the Spanish volcanic island of Tenerife. Growing in the ravines of Mount Teide (the world's third tallest volcano) wild groups of Echium wildpretii can be seen erupting from the sun-parched ground like burning daggers escaping a fiery underworld.
How to grow Echium wildpretii
As exotic as it looks, Echium wildpretii is surprisingly hardy and makes for a popular garden plant in both temperate and subtropical gardens.
Unfortunately while it is not quite tough enough to survive the cold wet winters of northern european climates, it will for short periods tolerate frost down to as low as -5 Celsius making it a perfect addition to Mediterranean gardens.
To get the best out of Echium wildpretii it will require a lot of sun and while it is typically found growing in arid conditions it will grow quite happily in most sites although it will prefer a light free draining soil. The sunnier the position the better the flowering will be. In conditions with lower light levels the flower spike will be much taller but far less dense and this can leave it prone to being knocked over in strong winds.
As biennial, it will not flower in its first year instead it will produce a dense rosette of deep-green, lanceolate and hairy leaves on a thick stem about 2-3 ft tall. Then in its second year (sometimes even its third under harsh conditions), it will rapidly grow to its full height of 12-15 ft as it producing its impressively tall flower spike. The red flowers are rich in nectar and are a favourite of bees and beekeepers alike. The plant blooms from late spring to early summer in Tenerife, after which the plant will die. However new plants will grow readily from the seed produced.
Peach trees produce the best flavoured and most succulent fruit that you can grow outside in a temperate environment. However there is one drawback to their production and that is the ease with which they can be infected with the fungus Taphrina deformans, more commonly known as peach leaf curl.
Why are the leaves on my peach tree curling?
Peach leaf curl is unfortunately both a common and widespread fungal disease and is particularly bad when following a cold, wet spring or if you are growing peaches near expanses of water.
Luckily the symptoms are easy to recognise. Soon after bud-burst the young leaves will thicken, curl and twist, and then become discoloured displaying patches of yellow and red.
The puckering and reddening increases with a pale, powdery bloom developing across the infected leaves which later turn a dirty brown before prematurely dropping. Young shoots though more rarely flowers and fruit can also become infected.
Why are the leaves on my peach tree curling?
Treating peach leaf curl is not straightforward but it can be effective. Remove and burn all affected leaves as early on in the season as is possible and before the powdery bloom appears.
There is no point destroying the leaves later on in the year or spraying them with a fungicide as next year's spores would have already been released into the near environment.
Be that as it may you will need to spray three or four times with a copper based fungicide just after the autumn leaf drop and then again as as the buds begin to swell in late February or early March.
Fan trained trees grown against the protection of a wall can be protected by a clear polythene screen from mid-winter until early spring.
If you are anything like me then your precious lemon tree is one of the prized possessions of the garden, and as such gets more than its fair share of close attention. Any change in leaf colour, or sign of insect damage receives detailed inspection to determine the cause so it is hardly surprising that sticky leaves will start alarm bells ringing.
Sticky leaves are a sign that there are aphids either infesting your lemon tree or a plant whose canopy is above the lemon tree. To make sure that the stickiness isn't cause by children's ice cream fingers check the new growth for signs of aphids and ants.
Why are the leaves on my lemon tree sticky?
Aphids passively feed themselves on the sap of phloem vessels. The phloem is the living tissue that carries organic nutrients, in particular sucrose, to all parts of the plant where needed. The aphid stabs the phloem vessel through the leaf using specialised mouthparts. The sap, which is under high pressure, is forced into the aphid's food canal.
The sap pressure is so great that the aphids ingest more than they can digest and the excess is released from the terminations of their alimentary canals.
This excess drops onto the any leaves below which over time become sticky as the sap dries out leaving a sticky, sugary substance. This is known as honeydew and is the substance that is making your lemon leaves sticky. The honeydew if often covered by a black fungus known as sooty mould. Although the sooty mould looks rather worrying it does not directly feed from the plant, instead it receives its nutrition directly from the honeydew.
This honeydew is often 'farmed' by colonies of ants. The ants provide protection from predators and in return eat the energy-rich honeydew that the aphids release. The ants 'milk' the aphids by stroking them with their antennae.
This mutualistic relationship is even closer in some farming ant species as they are known to gather and store aphid eggs in their nests over the winter. Come the spring the ants carry the newly hatched aphids back to the plants ensuring a food source for the following year.
Dawidi, Johannesburg file is licensed under the Creative Commons Attribution-Share Alike 3.0 Unported license.
For related articles click onto the following links:
The Iris genus contains approximately 260–300 species of flowering plants, but the absolute kings of this beautiful group of plants are the bearded Iris. Bearded Iris are not a single species but currently include 35 species and numerous cultivars. As exotic as they appear they are both surprisingly tough and easy to grow.
Bearded Iris
Bearded irises are are so called because of the hairy tufts displayed at the base of each of the three downward turned sepals.
Hundreds of hybrids exist representing every colour from jet black to sparkling whites. However there is still one colour missing, a truly red, red!
There is no such thing as a typical bearded iris but to try and make sense of the huge number of cultivars they have been split into three groups.
All Bearded Iris are fully hardy and require an open sunny position. They will grow well in any good garden soil so long as it is not too acidic, but will do best in neutral soil.
Plant rhizomes in late June and early July, or in early September. The ground should be prepared with well-rotted farm manure, compost and bone meal at a rate of 4 oz per square yard.
Plant the rhizomes facing the same way, in such a position that each rhizome receives the maximum amount of sunshine. Plant firmly but shallowly with the top of the rhizome just showing and do not allow the rhizome to dry out for two to three weeks. Plant the rhizome to deep and you risk it rotting away!
Bearded Iris flower
Late planted iris should have the roots well spread out. If by chance they are lifted by frost do not be tempted to push them back down as this will break any newly emerged roots. Instead carely build up a layer of sand or light soil back around the root.
To prevent wind rocking of newly planted iris, as well as excessive transpiration, trim the leave back by half. Taller specimens may need to be cut back further and be staked in place.
Remove any dead leaves by carefully peeling them off the plant and hand weed around the root to prevent damage to the rhizome.
You may need to provide shade for the roots during the heat of the day over its first summer. In the winter cur back and remove leaves for neatness and also to reduce the temptation of slugs.
Come the following March fork in a general purpose fertiliser, but one that is not too rich in nitrogen. Dead-head the flowers as they turn.
Camellias are not the cheapest of plants to purchase, in fact any specimen grown in pots larger than 10 lt can easily cost upwards of a hundred dollars! So once you have set your heart on a particular specimen, bought it home and lovingly planted it up, the last thing you want to see are its gorgeous, dark green leaves turning a rather worrying and insipid yellow colour.
Camellias are native to the acidic soils of eastern and southern Asia, and while they are more tolerant to neutral and even slightly alkaline soils than their distant cousins the Rhododendrons, they will still be adversely affected in most alkaline soils.
What is Chlorosis
Why are my camellia leaves turning yellow?
The yellowing of camellia leaves is commonly known as chlorosis, and is a commonly seen condition in acid loving plants grown in alkaline soils. Chlorosis occurs when leaves produce insufficient chlorophyll - the green colored pigmentation found in almost every single plant on the planet. The reduction in chlorophyll allows other pigments to show through - hence why the yellow carotenoid pigments now show.
Chlorosis usually occurs when there is a specific mineral deficiency in the soil, such as iron or magnesium, but in the case of camellias there may well be plenty of iron and magnesium available but the roots ability to absorb them becomes inhibited when they are subjected to a high pH.
How do you treat chlorosis
Why are my camellia leaves turning yellow?
Chlorosis can be treated by spraying the leaves with soluble iron foliar feeds every 2 - 4 weeks or more effectively by lowering the soil pH. This can be achieved by applying chelates, ferrous sulphate, aluminium sulphate, or sulphur to the soil surface and allowing them to dissolve into the soil by watering and rainfall. Of course this sounds a lot more complicated than it needs to be as water soluble, acidic plant fertilizers such as Miracid or Sequestrene can be applied as a weekly liquid feed to slowly reduce the pH and increase concentrations of the available iron and magnesium. Be aware that it will take weeks and not days for the effects to show through.
A traditional method used by Victorian plants men was to add a tablespoon of Epsom salts, dissolve it in half a gallon of water and water it in at the base of the plant. You can also apply this as a foliar spray. Victorian gardeners would also bury iron nails and other such items around the root ball before planting
How to avoid chlorosis on camellias
Camellia flowers
The simplest way to avoid chlorosis on camellias is to plant them in a suitably acidic soil.
If you are not sure of the pH of your soil then you can test it using a shop bought pH soil tester available from most large plant retailers.
Alternatively you can grow camellia in large pots using ericaceous (acidic) compost or, if you still intend planting your camellia in the ground where the soil is known to be alkaline, dig a larger hole than usual and back fill with plenty of ericaceous compost.
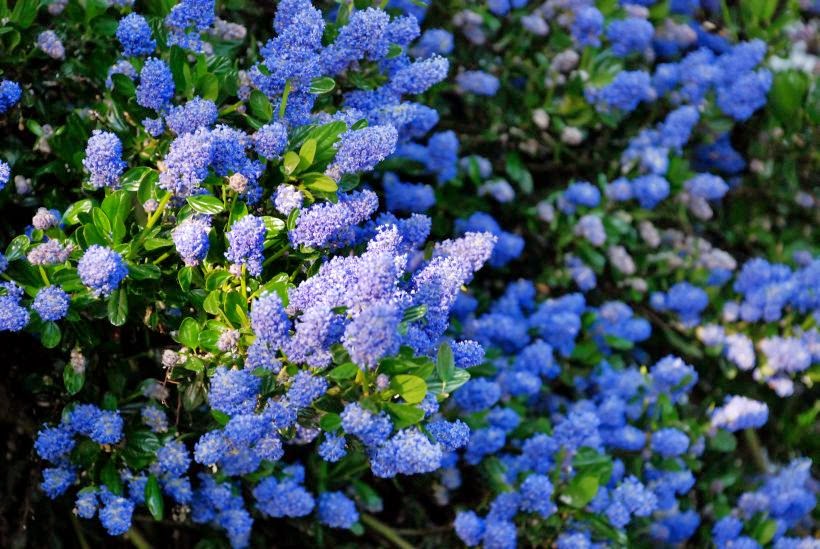
The Californian lilac - Ceanothus species, is one of the great colour events of late spring. They include so far at least 55 species of evergreen deciduous shrubs and trees and while they may have the common name of 'Californian lilac' they are as a family widely distributed all over the United States, and beyond to south Canada, and Mexico south to Guatemala.
Ceanothus 'Zanzibar'
Most of the ornamental species and cultivars available can vary anywhere between small and prostrate to being very tall and vigorous shrubs.
However, the plants usually found available are of a medium size and will provide the best blue flowered shrubs that can be grown outside in most northern European climates. In fact with their abundance of intensely, deep blue flowers there is little else that can compete with this stunning floral blanket.
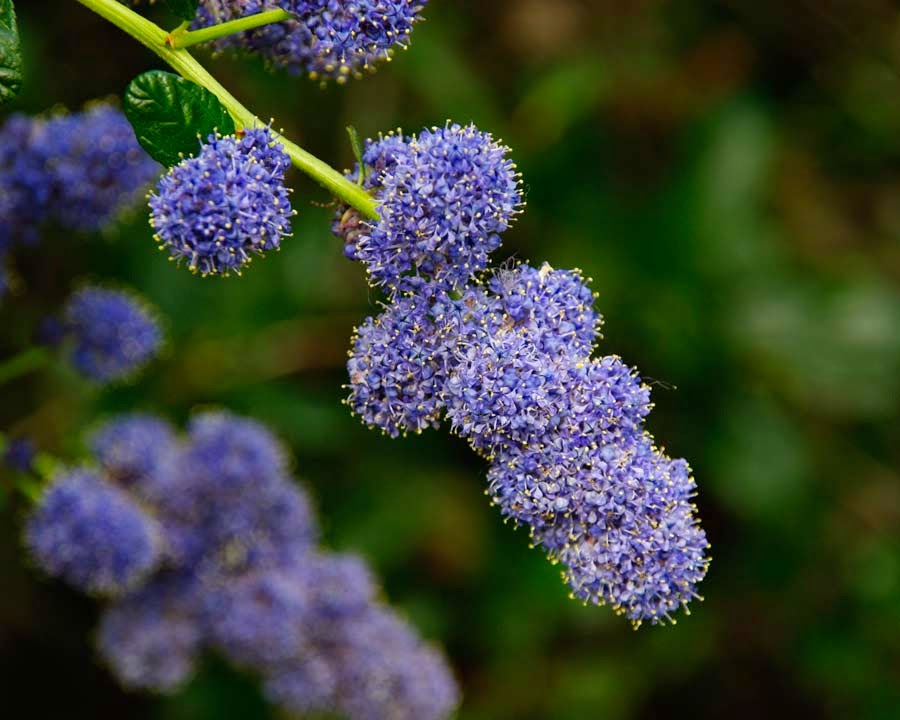
Ceanothus species are easily identified by their shiny upper leaf-surface and unique leaf-vein structure shared by all plants within this genus.
Ceanothus 'Yankee Point'
To get the very best out of your ceanothus you will need to provide them with a good, free-draining soil in full sun.
All species are lime tolerant to a point but may exhibit signs of chlorosis in light soils over chalk or those which have a pH above 8.
Ceanothus will do particularly well in sea-side gardens, although in colder regions will benefit from the protection of a wall.
Evergreen species require very little maintenance although they will benefit from a light pruning after flowering. Deciduous forms can have their lateral branches cut back to within 8-10 centimetres of the previous years growth in March.
Pitch plants are among some of the most unusual and exotic looking plants that you can grow and the North American pitcher plants - Sarracenia species include some of the hardiest species available.
The strange shape that typifies a pitcher plant has evolved as a result of its nutrient poor environment. In common with most carnivorous plants, pitcher plants have adapted to supplementing its nitrogen requirements through being carnivorous, which helps to compensate for the lack of available nitrogen in such habitats.
Pitcher plant seedlings
The best time to sow pitcher plant seeds is from December to March and you will first require an acidic compost with virtually no nutrients. Sphagnum moss peat compost or salt free coir will probably be your best options and you can also consider mixing some perlite or horticultural grit into the compost to improve aeration. Using a number of 4 inch plastic pots, fill with your chosen compost and then gently water with distilled water or clean rain water. Avoid using tap water as this contains chlorine and other minerals which can damage the sensitive roots.
Sow the pitcher plant seeds on the surface but do not cover with more compost as this will inhibit germination. Now stand the pots in a cold frame, cold glasshouse or sheltered spot outside, placed in a tray of distilled water or rainwater. Remove any leaves or debris that may fall into the water or periodically change the old water for fresh. The seedlings should begin to emerge in early summer.
How to grow the pitcher plant from seed
When they large enough to handle, carefully transplant each seedlings into its own 3 inch pot using the same compost mix as before. Avoid any damage to the roots. From there they can be potted on as required into 5 inch and finally 8 inch pots, always keeping the compost moist and only ever using distilled or clean rainwater.
Once all threats of late frosts have passed, harden off pitcher plants for a week or so before placing outside permanently in a sunny position. Never feed pitcher plants with plant fertilizers and always allow pots to drain after watering as heavily waterlogged can cause the roots to rot, particularly during cold weather.
Over the winter months the more tender pitcher plants should be brought into a frost free greenhouse, conservatory or cool, bright windowsill indoors where they will go dormant over the winter. Reduce watering during this dormant period but still keep it on the moist side. Never allow the compost to dry out or become waterlogged soil. During dormancy some pitcher plants may turn brown, no not worry as these can be trimmed away in the spring when the new growth emerges.
Come the spring, and unless you made some remedial pruning late in the autumn, most people's roses look a little worse for wear. Although the plant produces delicate flowers it is not itself a 'delicate flower' and the problem often seen with older specimens is that they either haven't been pruned or have not been pruned enough.
How to prune roses
Most roses will benefit for being pruned back hard otherwise they will become woody, lose their ornamental shape and produce progressively less blooms. Of course not all roses are the same and different groups will require
1. For hybrid tea and floribunda roses there is a rule that the old victorian head gardeners used to go by which is as follows:
'...The third bud of the third week of the third month...'
To be more specific you will need to cut just above the third defined, outward facing bud from the base of the plant, making an angled cut. It is also beneficial to remove any crossing branches, dead or diseased wood or branches growing towards the center of the bush.
How to prune roses
2. For rambling roses the procedure is different as the flower buds form on the previous years wood. Therefore there are generally left alone unless you are train a particular shape. Again make angled cuts and remove any diseased or dying wood.
3. Despite the name climbing roses are not true climbers but are more like selected hybrid tea or floribunda cultivars on a vigorous rootstock. Left to their own devices they will grow straight up and only flower on the top of the stems. Best practice is to allow the plant to develop a number of strong stems and bend them over (without breaking them) to produce a curved or straight horizontal branch system. This will encourage the desired flowering buds and after the flowers have finished these flowering shoots are cut back to the main branch work.
If you have ever travelled around the Mediterranean then you can help but be impressed by the enormous Agave specimens growing both wild along the beach-fronts and planted within smartly dressed, landscaped gardens. Of course, as associated as the agave is with the Mediterranean it is in fact a native of Mexico, although some of the 208 species within this genus can also be found in the southern and western United States and central and tropical South America.
How to grow Agave
There are a number of agaves which are surprisingly hardy, and they will even overwinter with very little work in the warmer, temperate regions of northern Europe. In fact the particularly robust Agave americana can be a common sight along the seaside properties of southern England.
The most popular and ornamental species include Agave americana, Agave angustifolia, Agave tequilana, Agave attenuata, Agave parviflora, Agave murpheyi, Agave vilmoriniana, Agave palmeri, Agave parryi and Agave victoriae-reginae, and with a little preparation they will grow quite happily with very little maintenance. The only problem that most people will have is trying to grow the more tender species in countries which experience temperatures below 10 degrees Celsius. However they are easily grown in pots and as such can be brought in under protection.
If growing in pots then agave will require a good quality, free-draining compost such as John Innes 'No2' however you may wish to add more horticultural grit to improve the drainage further.
The smallest specimens will only need a 3 inch pot and as they grow they can be potted on in succession to 12 inch pots. Any bigger and they will start to become too heavy to manoeuvre by hand.
How to grow Agave
During the summer these pot grown specimens can be grown in a warm, sunny position outside. Over the winter the plants must be kept at a temperature of over 5 degrees Celsius, smaller specimens can be brought indoors while larger specimens can be kept under greenhouse staging. Let containers dry out at least halfway in between watering but over the winter period watering may not even be necessary.
In the milder climates of northern Europe agave specimens will need to be grown outside in a sheltered, south facing position. They will be happy in most fertile soils except clay so long as it is extremely free-draining. If need be add plenty of organic matter and horticultural grit to the soil before planting. Raised beds or sloping borders are ideal. Some agave species such as the popular Agave americana can grow taller than 12 feet and can have a width of 6 feet, so position them in an area with little to no people traffic due to their sharp spines.
The most important thing is to make sure that the roots are not kept wet over the winter. If agave roots become waterlogged during long periods of cold they can easily perish. If you are concerned about the cold then you can always create a temporary polytunnel which will not only shelter it from strong winds and the worst of the cold it will also help to keep the soil dry.